Thursday, August 30, 2012

Make It Crafty - Melody

Today, I have a card to share using Melody Digi Stamp and Whimsical Mushroom Digi Stamp, both from Make It Crafty!


I combined the images, Melody Digi Stamp and Whimsical Mushroom Digi Stamp in Photoshop. I colored the resulting image with Copics. I stepped out of my box and colored her hair with pink highlights. I think she looks groovy!


 ***
 

***


***


I used Chippies for leaves for my flower and for a corner embellishment. I used a pearl white paint dauber to add some white to the chippies, and then used green alcohol ink to add color. 


I used the following products on my card...

DCWV textured cardstock
Designer Papers from Fancy Pants Designs
Copics
Pearl white paint dauber
Alcohol Ink
Flowers
Rhinestones
Spellbinders Ribbon Banners
Spellbinders Long Scalloped Rectangle

I am entering this card in the following challenges:

CLP Challenge


Thanks for stopping by today!


Wednesday, August 29, 2012

Windy Weather

Happy Wednesday! 
Our challenge this week at 7 Kids College Fund, our challenge is Anything Goes!


If you have followed my blog for any length of time, you know I am a Magnolia girl. But I have found a new passion. I just love Saturated Canary! These images are just adorable, and are now available in the 7 Kids College Fund Store

 ***
I used papers from K&Co and DCWV.

I am entering this card in Papertake Weekly Challenge - Free For All. I used sketch #65...


Thanks for stopping by today!


Friday, August 24, 2012

Coloring Long Hair - MIC Blog Hop

Zoe's excited to be releasing another colouring tutorial and it is on a topic that everyone always seems to want to improve... Colouring Hair!!  And in particular this e-book is, 'Colouring long hair in fine detail!'
Colouring Long Hair Tutorial


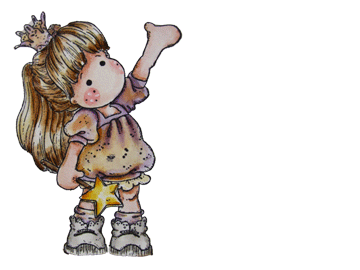
I am excited to have been invited to use Zoe's tutorial for coloring long hair. The image is gorgeous, and so fun to color.

I wish I had hair this incredible, but alas, no. I changed the colors for her hair to a slightly blonder version, as well as changing the color of her dress and eyes to green. In practicing the tutorial, I found that I did better if I used the flicking technique, throwing caution to the wind. When I tried for the detail, I got too heavy handed and messed up. With the free-flowing flicking technique, it all just came together.

When Zoe was trying to decide on an image that would be perfect for this tutorial she just knew she had to contact the gorgeous Krista Smith from Saturated Canary. And... Excitingly Krista has illustrated and generously donated this perfect character exploding with big luscious hair full of layers and bumps! Just perfect for you to learn all of Zoe's little secrets to colouring finely detailed hair. We thought it would be fun to have a little hop (and a few give aways of course) where the fabulous MiC girls and Krista have followed Zoe's tips and tricks to colouring long straight hair.
  1. Alyce
  2. Debbie
  3. Franz
  4. Sheila
  5. Krista
  6. Delphine
  7. Sandie
  8. Julie
  9. Ruby
  10. Tracy
  11. JennD
  12. Zoe
So next in the hop is the amazing Ruby. 

Thanks for stopping by, and check out Zoe's tutorial!!! She does a wonderful job of taking you through step by step in great detail. You won't be sorry!

Update: 
I should have shared the colors I used for my image, so here they are (lightest to darkest)...

Skin: E000, E11, E21, B63 (for shadows)
Lips: R20, R32, RV29
Hair: E31, E35, E57, E27, E49 (W5 for shadows)
Dress: G12, G14, YG17 


Wednesday, August 22, 2012

Tilda in Windy Weather

Happy Wednesday!

Today, I have a card using Tilda in Windy Weather. You can find this stamp at 7 Kids College Fund!


I challenged myself with the distress inks to work on a different style of coloring, leaving a lot of white space. This is the style that I see used in Sweden quite often. I love to challenge myself with new techniques. I used this Spellbinders frame, cutting around the umbrella before die-cutting to give the effect of the umbrella being blown off the image.  

 The pinecones are created using the Tim Holtz  Tattered Pinecone Die-Cut. I added Stickles to the edges for that bit of bling. The background spray is made with the Tim Holtz Autumn Gatherings Die-Cut. I added some acorn buttons to the edges to complete the autumn theme.

I am entering this card in the following challenge:


Thanks so much for stopping by today!


Wednesday, August 15, 2012

Happy Wednesday!

Today I am posting a card using an image from Make It Crafty.


For my card today, I used this lovely Steampunk image from Make It Crafty called Elizabeth J. I love the vintage look of the Steampunk stamps, so I used several Tim Holtz products to emphasize the vintage feel.


I used Copics to color Elizabeth J.


I used an acrylic tag that is shaped like a timepiece and added the "clock" paper with Crystal Effects. I embellished the timepiece with a copper chain to complete the timepiece feel.


I picked up the burgundy roses in the bridal section of the craft store. I like that they feel more vintage to complete the effect.

I used the following products on this card...


Paper - Tim Holtz Lost and Found 
Ink: Copics, Distress Ink
Accessories: Weathered Clock Die, Flowers, Leaves, Acrylic Tag, Crystal Effects.
 

Saturday, August 11, 2012

Silver Fairy

Hi Y'all!
I hope you are having a beautiful weekend wherever you are.
Today I want to share another card using Silver Fairy. 
  Copics 

I colored my image with Copics, and then used distress markers to add some extra depth to the shadows.

I used Copics to add some color to the charms. I used a heat gun to heat the charms after coloring to ensure the color set well.
Thanks so much for stopping by today!

Wednesday, August 1, 2012

7 Kids College Fund - Shaped Card

Happy Wednesday!!!

It is time for another 7 Kids College Fund Challenge. Our challenge this week is to make a "Shaped Card" so any shape other than the standard square/rectangle.


  Copics 
  Flowers     


I colored Tilda with Copics and added some shading with Distress Ink Markers. I used the Ink Blending Tool to add color to the edges of my papers. 


 The leaves are chipboard leaves that I got from Make It Crafty. I added some paint and a bit of ink with my Copics Airbrush System for dimension. I also used the airbrush system to color my white flowers to match the flowers on Tilda.
I hope you will join our challenge this week at 7 Kids College Fund! 

Thanks for stopping by today!